Home Assistant Bill Series: Fortis BC
Introduction
Do you want to be able to track your FortisBC bills directly in Home Assistant? Look no further! This guide will show you how to set up a REST configuration to be able to fetch these values and much more directly from the web application and automatically populate them in Home Assistant. When scraping values from websites, usually the easiest way to achieve this is to make HTTPS calls directly, parsing the response and extracting relevant values from it. However, for most modern web applications, we quickly run into two problems:
Scraping relies on finding values based on HTML tags and attributes making in brittle, especially as they are actively being maintained and changed. In fact Home Assistant no longer accepts integrations that rely on scraping since they need to be constantly updated. Many modern applications use hidden captchas to block scraping making it impossible to go beyond the login page.Hence, our solution must meet 3 criteria; it needs to easy to configure and update if the website changes, it needs to be able to get past hidden captchas and lastly, the data should be easy to load into Home Assistant. To do this, I used this community guide to achieve our goal. Enter the Browserless, a docker image that allows you to use a Home Assistant REST sensor to execute Puppeteer based script driven web scraping to extract a payload that can be returned as a JSON. The script is easy to read and modify if the selectors on the target webpage ever change.
Prerequisites
I currently use the new version of Browserless that I run in docker along side my Home Assistant instance. Image is based on tag:
ghcr.io/browserless/chromium:latest". The section below shows a more convenient way to run Browserless as an add-on along side
Home Assistant but features the older version of Browserless which also works but is less reliable. Payloads shown below are for the updated version
and need minor modifications to be compatible with Browserless v1. Please older commits in my repository to see samples.
Browserless V1: [Outdated]
Once added, search for Browserless Chromium, install and launch it. You should now have a REST
endpoint available in the Home Assistant on port 3000 at
http://homeassistant.local:3000/function.
HA Sensor Configuration
Note: This is the only section you actually need to configure the FortisBC data in Home Assistant. The remaining sections are an expanded guide on how we derive this configuration and how it can be maintained.
Copy the following REST sensor configuration in your Home Assistant either in the configuration.yaml or in rest.yaml and replace the USERNAME and PASSWORD parameters in payload section. Feel free to modify the scan_interval parameter to however often you want to fetch data. Home Assistant's REST platform allows you to define multiple sensors for any given endpoint and we will need to use that as our response comes back as a json with multiple values.
rest:
  - resource: "http://192.168.0.3:3000/function?timeout=120000&stealth=true"
    method: POST
    timeout: 120
    scan_interval: 86400
    headers:
      Content-Type: "application/json"
    payload: >-
        {"code": "export default async ({ page }) => { try { const username = \"[USERNAME]\"; const password = \"[PASSWORD]\"; await page.goto(\"https://www.fortisbc.com/accountonline\"); await page.waitForSelector(\"#user\"); await page.type(\"#user\", username); await page.type(\"#password\", password); await Promise.all([ page.waitForNavigation(), page.click('input[title=\"Account login\"]') ]); await page.waitForSelector('.bill-section'); await page.waitForSelector('span.text-ahead'); const billData = await page.evaluate(() => { return { balance: document.querySelector('span.text-ahead')?.innerText.trim().replace(/[^0-9.]/g, \"\") || null, last_bill_amount: document.querySelector('.bill-section .last-bill .currency')?.innerText.trim().replace(/[^0-9.]/g, \"\") || null, due_date: document.querySelector('.bill-section .last-bill div:nth-of-type(2)')?.innerText.trim().replace('Due on', '').trim() || null, next_bill_date: document.querySelector('.bill-section .next-bill .currency')?.innerText.trim() || null, next_bill_date_countdown: document.querySelector('.bill-section .next-bill div:nth-of-type(2)')?.innerText.trim() || null, last_payment_amount: document.querySelector('.bill-section .last-payment .currency')?.innerText.trim().replace(/[^0-9.]/g, \"\") || null, last_payment_date: document.querySelector('.bill-section .last-payment div:nth-of-type(2)')?.innerText.trim().replace('On', '').trim() || null, }; }); await Promise.all([ page.click('[title=\"View consumption history\"]'), page.waitForNavigation() ]); await page.waitForSelector(\"table[id^='consumptionHistory']\"); const consumptionData = await page.evaluate(() => { const table = document.querySelector(\"table[id^='consumptionHistory']\"); if (!table) return {}; const firstRow = table.querySelector(\"tbody tr\"); if (!firstRow) return {}; const cells = firstRow.querySelectorAll(\"td\"); const lastBillingPeriod = (cells[0] && cells[1]) ? `${cells[0].innerText.trim()} - ${cells[1].innerText.trim()}` : null; return { last_billing_period: lastBillingPeriod, last_billing_period_number_of_days: cells[2] ? cells[2].innerText.trim() : null, last_billing_period_consumption: cells[3] ? cells[3].innerText.trim() : null, last_billing_period_avg_temperature: cells[4] ? cells[4].innerText.trim() : null, last_run: new Date().toLocaleString(\"en-GB\", { day: \"2-digit\", month: \"short\", year: \"numeric\", hour: \"2-digit\", minute: \"2-digit\", second: \"2-digit\", hour12: false }) }; }); const result = { ...billData, ...consumptionData }; console.log(JSON.stringify(result)); return result; } catch (error) { console.log(JSON.stringify(error)); return { error: error.message }; } };"}
    sensor:
      - name: "Fortis BC Balance"
        value_template: "{{ value_json.balance }}"
        unit_of_measurement: "$"
        device_class: monetary

      - name: "Fortis BC Last Bill"
        value_template: "{{ value_json.last_bill_amount }}"
        unit_of_measurement: "$"
        device_class: monetary

      - name: "Fortis BC Due Date"
        value_template: "{{ value_json.due_date }}"

      - name: "Fortis BC Next Bill Date"
        value_template: "{{ value_json.next_bill_date }}"

      - name: "Fortis BC Next Bill Countdown"
        value_template: "{{ value_json.next_bill_date_countdown }}"

      - name: "Fortis BC Last Payment Amount"
        value_template: "{{ value_json.last_payment_amount }}"
        unit_of_measurement: "$"
        device_class: monetary

      - name: "Fortis BC Last Payment Date"
        value_template: "{{ value_json.last_payment_date }}"

      - name: "Fortis BC Last Billing Period"
        value_template: "{{ value_json.last_billing_period }}"

      - name: "Fortis BC Last Billing Period Number of Days"
        value_template: "{{ value_json.last_billing_period_number_of_days }}"
        unit_of_measurement: "Day"

      - name: "Fortis BC Last Consumption"
        value_template: "{{ value_json.last_billing_period_consumption }}"
        unit_of_measurement: "GJ"
        device_class: energy

      - name: "Fortis BC Average Temperature"
        value_template: "{{ value_json.last_billing_period_avg_temperature }}"
        unit_of_measurement: "°C"
        state_class: measurement

      - name: "Fortis BC Last Run"
        value_template: "{{ value_json.last_run }}"
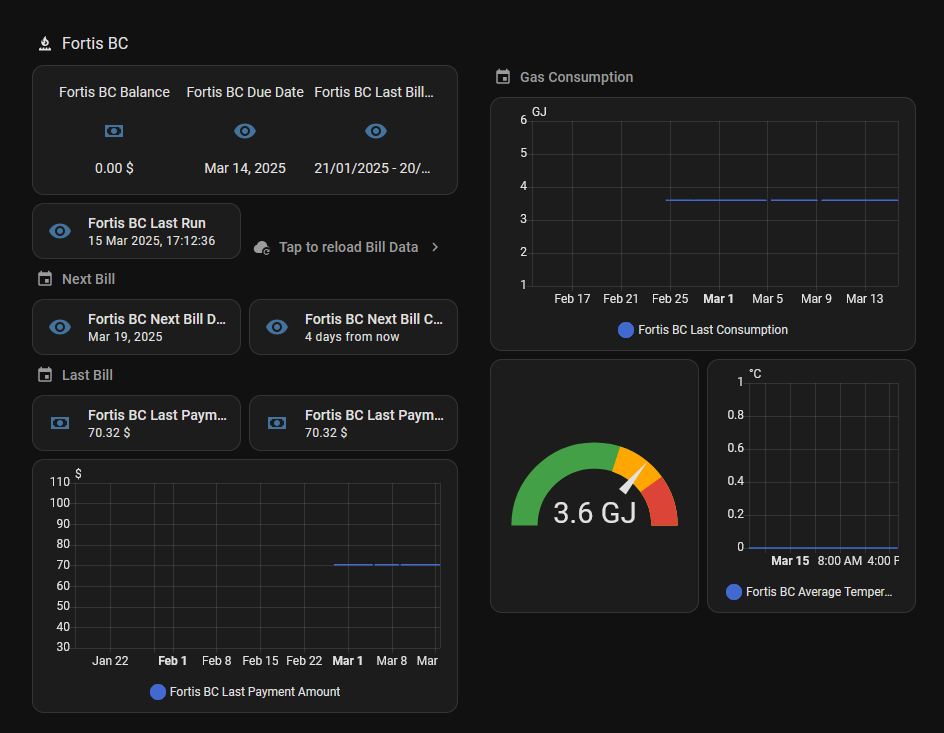
The data points being collected are:
- Balance
- Due Date
- Last Bill Amount
- Next Bill Date
- Next Bill Countdown
- Last Payment
- Last Payment Date
- Last Billing Period
- Last Billing Period Number of Days
- Last Billing Period Consumption
- Average Temperature
- Last Run
Please create an issue on the repository if the payload stops working due to DOM changes.
Payload Script
The Puppeteer script is fairly straight-forward with some required parameters, namely username and password that you will have to substitute with your own. Other parameters like default timeout and default navigation timeout can also be adjusted. Each step performs the required user action or navigation, and uses attributes and selectors to find the data we are looking for and can easily be adjusted in case they change in the future. To compile the script to the required JSON payload in Home Assistant's REST sensor configuration, I've added a small bash script at the end of this guide that you can use to .
Payload Script to Configuration
To convert the Puppeteer payload script into a single line JSON payload, I use the following BASH script compile-payload.sh. Usage is ./compile-payload.sh [script-file] to output the payload directly in the terminal. You can copy this directly and paste it in the line following payload: >- in the Home Assistant REST configuration.